Sunday, November 1, 2009

Halloween Costumes 2009

Much work was put into costumes this year, but spread out a bit so as to not be so overwhelming. Here is the link to the costume pics on the other blog.

The top of my costume was made entirely by me and a combination of about 3 different patterns with multiple modifications on my part. The bottom was a repurposed skirt that used to be white and I never even wore once. It was also too big and rolled over 3 times at the top. I threaded the beads through the bottom and dyed the whole thing "sunflower yellow". I was not in the mood to make a skirt....but unfortunately I have now got 6 yards of yellow chiffon....just in case anyone has a need. Also, a shout out to silk velvet, just as a whole. The navy blue on the sides of my top was made with the $24 per yard stuff and it was sublime. I only needed 3/4 of a yard so I went for it. Feels sooooo good. I got the apple necklace and earrings marked down at Party City--I hate that store--but it was broken off the earring back and I had to remake them from scratch. They only cost $3.99 though.
The fairy tale princesses...ish.
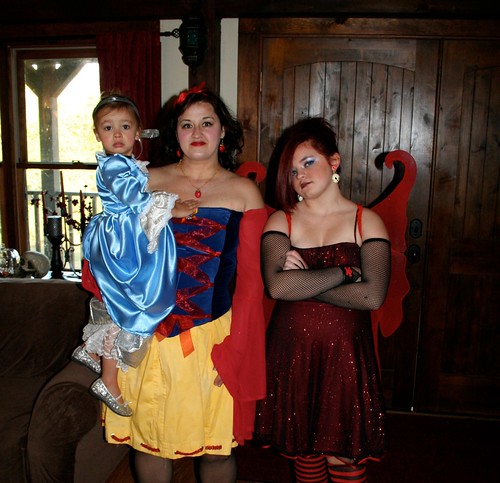
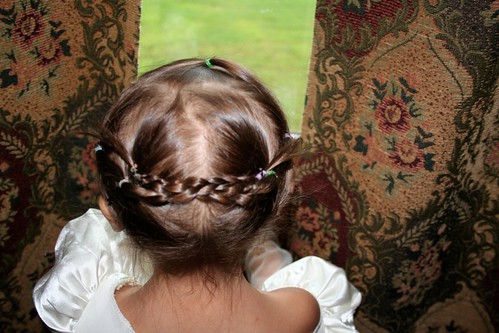
Cinderella was also made by me. The blue satin has silver glittery sparkles on it and she picked it out herself as THE Cinderella blue. The shoes are her own, the velvet choker is a scrap held together by scotch tape and the headband is a ribbon. I bought a blue headband, but she said Cinderella had a "HEADBAND!!", which to her is a ribbon. So, we have a ribbon.
Goth Tinkerbell is a purchased dress we got at Ross for $14, wings that I have in my wing stash (yes, I have a stockpile of after-halloween wings. Dont you?), her own Doc Marten's that she wears to school practically daily and an exorbitant amount of eye makeup. Also, purchased skull wristbands and mesh arm thingies. The stockings are also from my stash....

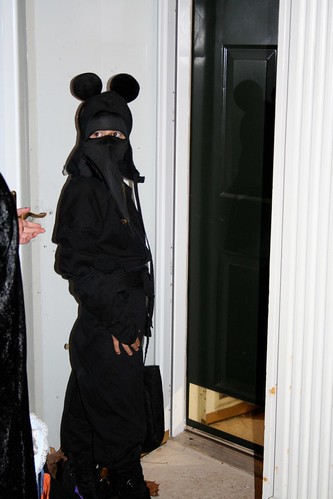
For the boys, we have the Ninja Mickey Mouse which is a internet bought ninja outfit. I dont really understand how Ninjas work, but apparently there are real people who think they are them....and they sell outfits. It only cost like $25 and is very high quality cotton...like a karate uniform. He wore his Renaissance Faire boots instead of the weird split toe boots they sell for ninjas. And the Mickey ears were bought, obviously. It made for a hilarious silhouette.
IMG_7895

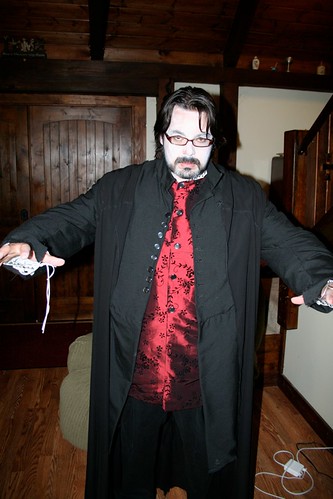
Chris's Vampire Prince Charming outfit is a newly made vest from an old pattern I had. The fabric was originally going to be this gown when we were planning a Bram Stoker's Dracula theme, but when we changed to Disney theme, it got set aside. Perfect for the vamp vest though! I love the fabric. The rest of his outfit is his repurposed Snape costume and some white face paint.
Vampire prince charming....not allowed to wear vamp teeth because Caris thought they were too scary.

We had a great time, everybody was comfortable in their outfits and I really didnt spend too terribly much this year. That is always good. Happy Halloween....the best holiday EVA!!!

Tuesday, October 27, 2009

Crock-Pot Cheeseburger Soup

I am on an endless quest to find more than 5 recipes that I can make in the crock-pot that everybody likes....okay, to find more than 1 recipe everybody likes. Really the only thing I have EVER made in the crock-pot that isn't met with disdain is the Pot Roast with Peppers. I have tried about a million other things--much to everyones distress--but to no avail. We eat most every possible kind of food and so do the kids, so you wouldn't think this would be so hard. We just universally don't like wet, tasteless meat and that is pretty much what I always end up with. We just have never gotten the "food is fuel" memo and still expect everything we make to taste like we worked all day at it. The best crockpot tip I was ever given was by a co-worker that told me I didn't have to add liquid at all. She was very right, and may I say that "her" crockpot bbq wings are always delicious. I have never had her luck with those, however....mine are always just slimy-ish.

So, as I was driving home from kid drop off this morning, I was already thinking about dinner. I had to stop at Walmart anyway and I REFUSE to buy meat there so I had to pick up just additions to what I had at home. I thought of some hamburger meat leftovers and thought I had been so creative by thinking of adding it to cheese soup for---wait for it----Cheeseburger Soup. But, alas, there are recipes for it all over the internet so I cant quit my job and write cookbooks for a living just yet. Bummer.

Anywhoo, I found one recipe without too much colorful stuff floating in it--that is always a deal breaker for the kiddos. I had to low-carbify it for our purposes and I have some mental block when it comes to "cheese food" and "velveeta", so I bought this stuff instead.

I like to feel, in my own twisted brain, like I am not l poisoning my children.....I probably still am, but at least this has the claim of being actual --though tasteless-- cheese.

So, this is really just a mismash of several recipes I found on the internet. I do not cook for low-fatness, just for taste and low-carbness so....here it is.....

Ingredients:
6 cups broth (I did 1/2 chicken and 1/2 beef)
1 pound browned ground beef
1 tsp garlic powder
1 packet onion soup mix
1 head of cauliflower chopped (just use 2 potatoes if you must)
To add at the end:
1 cup half and half
2-16oz blocks of processed american cheese, cubed

Put the first 5 ingredients in the crock-pot and cook on low for 6 hours. Turn crock-pot to lowest setting or just off about 30 minutes before serving and add the milk first, then the cheese. You dont want it boiling when you add the cheese or it will curdle, so add the milk first to cool it slightly. It will still be plenty warm to melt the cheese over the next half hour or so.
Garnish with tabasco sauce, crumbled bacon, sour cream....whatever.
___________________________________
PS.
We made this just as it says. We didnt garnish with anything and it was very good. Kinda like Cheeseburger Macaroni soup without the macaroni....same kind of taste. I should have taken a picture, but i didnt. We will definitely make this again because it is very simple and quite good. We didnt have any (carbs dontcha know), but this would be awesome with a big loaf of crusty bread for dipping.

Thursday, September 24, 2009

Homemade Play Clay

We used toake this for the other kids and I just thought of it today. Classic recipe, but I will post it anyway. Of coarse ours is kinda organic-y looking since all I had was whole wheat pastry flour and olive oil...there is room for improvisation, needless to say.

Stove Top Playdough
--from Vicki Lansky's book "Feed me, I'm yours"
1 cup flour
1/4 cup salt
2 tbsp cream of tartar
1 cup water
2 tsp food coloring
1 tbsp oil
(I made 1 1/2 times this recipe, held the food coloring out till the end, split the dough in half and did two colors)
Mix all the ingredients in a saucepan. Cook over medium heat 3-5 minutes. It will look a globby mess, but as soon as it forms a ball in the middle of the pan, it's done. Flip it out onto the countertop and knead it until it is softer and cooled off slightly. ( this would be the point where I divided and kneaded in the food coloring. the paste kind makes darker colors. I also kneaded in some almond extract to make it smell less flour-ish.)
See, easy peasy. If you have the ingredients, it takes like 5 minutes and is much more pliable than store playdough.


-- Post From My iPhone

Friday, August 28, 2009

A Big Girl Room Remodel

The baby girl is getting bigger and bigger by the day, unfortunately. She is now completely potty trained--day and night. She has felt free to climb out of her crib and wander at her leisure for some time now. And, let's be honest, I never really "decorated" her room the first time. We bought one pack of vinyl pink sticker thingies to put on the wall and a fancy bedding set from Babies'R'Us and that was about it. We didnt even repaint the loft turned nursery for her arrival (LAZY).
So, it is the time!! On my first excursion to Atlanta to visit my sis, we hit the ever-fabulous Ikea. I had been looking for some color inspiration for this potential room and found a great comforter cover there. A few accessories to match and we were out of there for less than $50. Deal of the century. Add onto that another $35 in paint and about $20 in odds and ends and it brought me in just barely over $100 for the entire project....well, that and about 2 days of my time, but I will give her that for free.

This was the starting wall color with sticker things still in place. Obviously we had already started dismantling things. We are messy, but not quite this bad!
Room Redo--1st Big Girl Bed

Now, I am going to start right here and now and say that I blatantly stole lots of ideas straight off the internet and particularly etsy. There are some of the cutest wall decals on etsy, for pretty reasonable prices, too. But, not within my budget and frankly it is easier for me to just wing it with a paintbrush than to actually take the time to order anything. I am a big proponent of "you can always paint over it".
So, here goes.
All things start with a proper tape job.
Room Redo--1st Big Girl Bed
And a new wall color (BAM!!).
Room Redo--1st Big Girl Bed

And so, we begin the design portion of our show.....
Gigantic branch coming out of the wooden wall.
Room Redo--1st Big Girl Bed
Embellishment of said branch.
Room Redo--1st Big Girl Bed
Add a little branch on the other side for symmetry....we MUST have symmetry...
IMG_7698
Hmmm, perhaps i forgot to mention the red stripes on the back wall......oops.....we like some two-tone rooms around here...

Anyway, must tie the red stripes into everything else. The poppies were kindof an afterthought....also stolen from etsy....I was getting a little over-swirled with the branches. I had planned for some kinda graphic swirlyness under the window, but changed at the last minute.
Room Redo--1st Big Girl Bed

Now this "over-doing it" portion of our show....the mural branch was lacking something. I decided it was a worm....and a crown on the bird.
Room Redo--1st Big Girl Bed
A valance and some ribbon over the existing curtains.
Room Redo--1st Big Girl Bed
And finally, some linens and a handmade bedskirt added to a bed made of two footboards so it is low and my baby wont fall far when she tumbles out in the middle of the night.
Room Redo--1st Big Girl Bed
Oh, and a gigantic orange bolster and the cute night light lamp from ikea. And the handpainted sign from Aunt Katelyn.

Ta-daaaaaa....
Room Redo--1st Big Girl Bed

Here she is trying it out for the first time....she seems a little freaked....
Room Redo--1st Big Girl Bed
......sharing her spot with the big bro....
Room Redo--1st Big Girl Bed
....oh, did I mention the awesome green sheets....oops.....
Room Redo--1st Big Girl Bed
...fake sleeping....
Room Redo--1st Big Girl Bed
.....fake sleeping only lasted for seconds, then the jumping began....
Room Redo--1st Big Girl Bed

I know she is bad! There is no covering it up. But, she is like the cutest thing ever, so what am I going to do?!
Room Redo--1st Big Girl Bed
The End!!

Tuesday, August 18, 2009

Ollivander's - Makers of Fine Wands since 382 B.C. (a tutorial)

Caris is on a big Harry Potter kick these past couple weeks. The Sorcerer's Stone is pretty much running on a loop in the living room and she is giving lectures to me about Dumbledore and the "cat that turns into a lady". 
Also, at every opportunity she is casting spells on me that will either open me up (alohamora) or make me float (wingardium leviosa)--all performed with either a stolen wand from her brother or any random stick she comes across.  As anyone who knows me is well aware, I am incredibly proud of my baby. She is awesome.  Not every two year old in the world is capable of mastering "swish and flick" with such panache, put a proper wizard needs a proper wand...

So, now we come to the crafty portion of this post. Admittedly, I overdo things to the nth degree....that is a given at this point.....

These are the supplies. Total cost = $5.  That is just one dowel chopped up.  The little things on top were mini candle holders that I sawed the base off with a miter saw (can you say protective goggles).


Then--again, I overdo--I embellished them with a woodburning tool (and also burned 3 holes into my shirt which is unrelated to this project).


And finally, color and finish. Caris handpicked metallic purple for hers, Jack requested gold and I made the blue for Julia just to be funny. It is her favorite color and I made it tiny so she can carry it in her purse....she will be thrilled, I'm sure. The other is just an extra to use up the dowel.


The older kids already have proper wands from previous birthdays/Christmases, but who can't use an extra?! Am I right?! And they are personalized!
This is Caris's first of her very own, though, and she is loving it up!!


;o)

Tuesday, August 4, 2009

Jealousy

This is my sister-in-law's.


It makes this.


I now have much jealousy.

-- Post From My iPhone

Monday, August 3, 2009

IKEA=awesome!!

We went to Atlanta this weekend to visit with the sister and bro-in-law. They just moved there so they don't yet have a handle on all the city amenities, but I knew I wanted to hit IKEA.


The girls headed there on Sunday while the boys went gocarting and buying blanco zapatos ( long sorted story). It was terrific as ever and I managed to escape for less than $150--which I thought was pretty good.
Caris is in need of a new big-girl room so we shopped for that...very successfully. This pic isn't what we got but is one of many many beds Caris tried out.


We got recyling bins, a coffee carafe, a giant mug for Julia, and a clip on bedlamp for Jackson, and a couple of gifts I was needing in the near future. Good haul.
I should have gotten some whisks because I do love a whisk.


-- Post From My iPhone

Thursday, July 30, 2009

Being lazy sometimes pays off


Here is a picture of a pumpkin plant that is growing right next to my front porch steps. It is not a coincidence that it is growing in the exact spot that our Halloween pumpkin sat.
Gardening tip for you--let your pumpkin sit on the grass after the holidays and throughout the winter. By spring it will have planted, composted and fertilized a new plant naturally and you don't even have to dig a hole:-)
As a side note, I finally made the baby girl something out of the "kisses" material we bought months ago. It is kinda goofy, but I did kinda just freehand it, so it is what it is. She is still cute regardless, IMHO.


-- Post From My iPhone

How cute is this trim?!

Julia found this at textile fabrics when we went. We had to buy a yard, but I have no idea what we are going to do with it.


It is hula girls in case you can't tell.
-- Post From My iPhone

Tuesday, July 28, 2009

Wordless Wednesday

IMG_7569

Sunday, July 26, 2009

French Horn Pants

No, the pants arent for the french horn...they are for the french horn player.
Julia and I went for a quick trip to the awesome Textile Fabrics in Nashville and she found this cute stuff.
IMG_7518
She also decided that she needed these loungy-pants for a slumber party that was happening in like 2 days...it was imperative. Like a good servant, I did as I was told.
IMG_7519
Also, blue is the favorite color....that is where the ribbon comes in. We must cover all the bases.
This is the same pattern I used for the bacon pajama pants mentioned in this post, but this time properly sized. They turned out just fine and she wears them way too constantly.
IMG_7528
How's that for a smart-assed look....?

Sunday, June 28, 2009

Handcrafted Bumpit

Yea, so here is the thing. Bumpits are stupid looking. I have no clue why anyone would spend $19.99 on a hard plastic thing that is going to stab you in your head just so that you can have hair that looks like Elvira, Mistress of the Dark.
That being said, people get really really goofy acting at about 4am with the soothing sounds of 20 screaming babies behind you and we have a whole lot of little baby hats sitting around where I work....so I handmade a bumpit out of a couple stray hats and hired me a real cute pregnant model to show of my handiwork. I will be charging $9.98....limited time only, so get yours now!!

Oh, yea....and if you click on the picture, Courtney's head gets GINORMOUS....it's awesome!!

Guide to Mommy Porn

May i just say that my husband proudly sent me this--and even recognized the Outlander reference having never read the book..... Considering that this is 2009 and not 1709, that is damn near as good as him giving me some bad guy's head in a sack!!! Then they have....well you know how it ends....

Wednesday, June 24, 2009

Low Carb(ish) Coconut Cream Pie

My fine friend Ellen from work gave me THIS COOKBOOK at work last night (gracias) so I had to make something from it right off the bat. I found several options that intrigued me, but since a Walmart is my closest grocery store and it is the lamest store ever and I hate it--if not just for my own loathing, but in honor of Ellen and her overwhelming hatred of it-- I chose this recipe that sounded delish and that I had all the ingredients on hand. Walmart SUCKS!!
Anywhoooo, I didnt make the crust that was suggested in the book, though I think it would be probably very tasty. The shortbread cookie crust they suggested required actual shortbread cookies and guess what store decided to quit carrying all their sugar free cookie products today just to annoy me. So, I made the "traditional pie crust" from the book. It was pretty tasty, though I will say a bit of a wheat-y flavor since it was made with whole wheat pastry flour. A perfect pie crust texture though and held together well so you could actually pick up your piece of pie. I will definitely use the recipe again.
The filling was really really good. It would be good as just a pudding with whipped cream on top....that may happen sooner than later and would make this much less time consuming without the crust making and baking.
I say this is low carb(ish) because it is definitely not an everyday dish. A piece of this pie made with the shortbread crust would have 16 carbs. A piece of store bought coconut cream pie has 40+ carbs, more than half of which is pure sugar.
So, here is the recipe and both crust options.

Coconut Cream Pie
for the coconut layer:
1 1-ounce package sugar free instant vanilla pudding mix
1 cup low carb milk (or 1/2 cup heavy cream mixed with 1/2 cup water)
1 1/2 tsp coconut extract
1/4 cup unsweetened coconut, toasted, divided
3/4 cup whipping cream

for the whipped cream layer:
1 cup whipping cream
3 packets splenda
1/2 tsp vanilla extract

also, make one of the crusts below, bake and cool.

1. For coconut layer: In a small mixing bowl, whisk together the pudding mix, milk, coconut extract, and all but 1 tablespoon of the toasted coconut (reserve the rest for garnish at the end). Set pudding mixture aside. In a medium mixing bowl, using an electric mixer on med-high speed, whip the cream until soft peaks form. Add reserved pudding mixture to the bowl with cream and whisk until well combined. Refrigerate for 30 minutes.
2. For whipped cream layer: Whip cream, splenda and vanilla until stiff peaks form.
3. Assemble the pie by spreading the pudding mixture over the crust using a rubber spatula, then spooning the whipped cream mixture over the center of the pudding, spreading it to the edges. Sprinkle reserved coconut over the top.

Carbs are 11 per serving assuming you cut it into 8 pieces.

Traditional Pie Crust
1/2 cup wheat gluten flour
1/2 cup whole wheat pastry flour
1/4 cup almond flour
1 tbsp granular splenda
1 egg yolk, beaten
3 tbsp cold butter
3-4 tbsp very cold water

Preheat oven to 375. In a mixing bowl stir together the gluten flour, pastry flour, almonds and splenda. Stir in egg yolk with a fork and then the butter mashing it into coarse crumbs. Add the water a tbsp at a time until you can get the mixture to form into a ball. Let it rest for a few minutes while you spray your pie pan with some cooking spray.
Roll it out and put it in the pan--I am paraphrasing, obviously.
Bake for 15-20 minutes...watch it so it doesnt burn at the end, but good and brown is better than under done.

Carbs are 9 per serving assuming you cut it into 8 pieces.

Coconut-Shortbread Cookie Crust
24 Murray sugar free ring shaped shortbread cookies, crushed
1/2 cup unsweetened coconut
5 tbsp butter, melted

Preheat oven to 350. In a small bowl, combine all ingredients together. Spray pie plate (9 inch) with cooking spray, then pat crust mixture into bottom of pan.
Bake for 8 minutes, until nicely browned. Let cool before filling.

Carbs are 5 per serving assuming you cut it into 8 pieces.

This is the crust I made before I baked it.
IMG_0284
Filling and topping--pardon these awful pics, my regular camera battery was dead so these are phone pics!
IMG_0290IMG_0291IMG_0293

And, finally, the finished product. It was yummy!
IMG_0294
Let it be know that all of these recipes come from Everyday Low-Carb Desserts: Over 120 Delicious Low-Carb Treats Perfect for Any Occasion (Paperback)
by M.S. Kitty Broihier M.S. R.D. (Author)
Shout out to her!!

Tuesday, June 16, 2009

Tudor Houses are Awesome

Anyone who knows me knows my love of all things English-y. I have a particular adoration of wonky Tudor houses. They are also called half-timbered houses or timber frame, but to me they are just Tudor ala King Henry.
We in America have a version of these....they have it in England too....that is called Tudor revival. Drive through some fancy neighborhoods-and even some not so fancy ones-and you will see the decorative trim that is on gables that is a throwback to the real thing. These houses are not authentically timbered but have trim styled like they are--there is no relation from inside to outside of the house. I am not hating on these...they are cute and I like them fine, but that is not what I am talking about here.

In true, ancient half timbered houses, the entire house was made with a timber frame. There are no studs inside the walls like modern construction. The builder made a giant frame for the house out of big heavy timbers and pegged them together. In between the beams the space was filled with rocks, bricks, rubble, sticks or anything they could come up with to fill in the space and then they "stuccoed" over the filler. The walls were as thick as the beams they made them out of and the beams were exposed on the inside and outside of the house. This is what an authentic wall was filled with....minus the glass frame, obviously....
IMG_7315

There is modern timber framing....I live in a modern timber framed house. Kinda the same as the authentic, but not really. The whole "filling the walls with junk and stuccoing over it" thing is not very modernly energy efficient. This is what a modern timber frame looks like while being built....this is mine....
Our timber frame
All smallest upright in that frame is 6X6 inches....some are bigger than that. But now, instead of filling in between them, we attached SIPs to the outside of the frame. This means you can see the beams on the inside of our house, but not the outside....so we faked it on the outside.
Inside....drying in - 10
Outside..frontporch.JPG

Enough of all that construction talk....THIS is why I love them. We took these on our awesome trip to London that we just got back from....click on any of these to go to the photo-set and see all of the ones we took.
IMG_7346
IMG_7288
IMG_7286
IMG_7102
IMG_7098

And finally, here is a funny story. We were walking through Hampstead Heath and happened upon the most picturesque, perfect little cottage in the woods. It looked like something out of Hansel and Gretel and before we even got up to it we had discussed how lucky the resident was and wondered how they lucked up and got the gig that got them living in the cutest house ever in the middle of this awesome park, etc, etc.... This is the house....
IMG_7055
IMG_7054

Okay, now wait for it.....


IMG_7052
It was the park bathroom....i would still live there forever....